Users
To manage users on the platform, Click on ![]() Users in the navigation bar.
Users in the navigation bar.
This page will give you access to view the list of users from your organization, their job roles, the team they belong to, and the percentage of their Pathways Completion and Items Completion.

1. Job Rules
To manage the Job roles of your organization on the platform, Click on Job Roles in the upper left toolbar.
This list will enable you to view all the job roles in your organization, the Users Count belonging to each job role, and the percentage of their overall Paths Completion and Items Completion.
You can also view the users fulfilling each Role, their Respective Teams, their User Status, and their Personal Items Completion.

1.1 Add Job Role
Click Add to manually include a new Job Role to the platform. Click on Create a new job Role and follow the steps below to perform this action successfully:
- Enter the Name of the Job Role you wish to create.
- Select the appropriate Job Level and Job Family.
- Write a brief Description of the job role.
- Click Save to add the job role to the platform.

1.2 Edit Job Role
Click on Edit to amend the details pertaining to the selected Job Role. Follow the steps below to Edit the Job Role details successfully
- Enter the new Name of the Job Role.
- Enter the new Job Level and/or Job Family of the Job Role.
- Add a Description to the role.
- Press Save to save the changes made.

Note: Click on ‘Collapse All’ to hide the job roles and view departments only.
2. Teams
You can further filter all users according to Teams.
This list will give you access to the teams or departments from your organization, the number of users belonging to each Team, and the percentage of their overall Pathway Completion and Items Completion.

2.1 Add Teams
Click on Add, to manually create a new team on the platform. Follow the steps below to add the team successfully:
- Enter the Name of the team you wish to create.
- If you wish to create a sub-team, select the Parent Team option to specify where the team you are creating will fall from the drop-down menu.
- Click Save to onboard the team onto the platform

2.2 Edit Teams
Click on the Edit to amend information pertaining to the selected team. Follow the steps below to edit the information successfully:
- Choose a new name for your team.
- Select the Parent team, if required.
- Click Save to reflect all the changes made.

Note: Click on ‘Collapse All’ to hide the sub-teams and view parent teams only.
Navigating Users

1. Search Bar
To search for any user data, click on the
Note: you can add and manage custom user fields by clicking on Manage Custom Fields.
2. Actions
Click on ![]() Actions to perform such actions:
Actions to perform such actions:
2.1 ![]() Send Emails
Send Emails
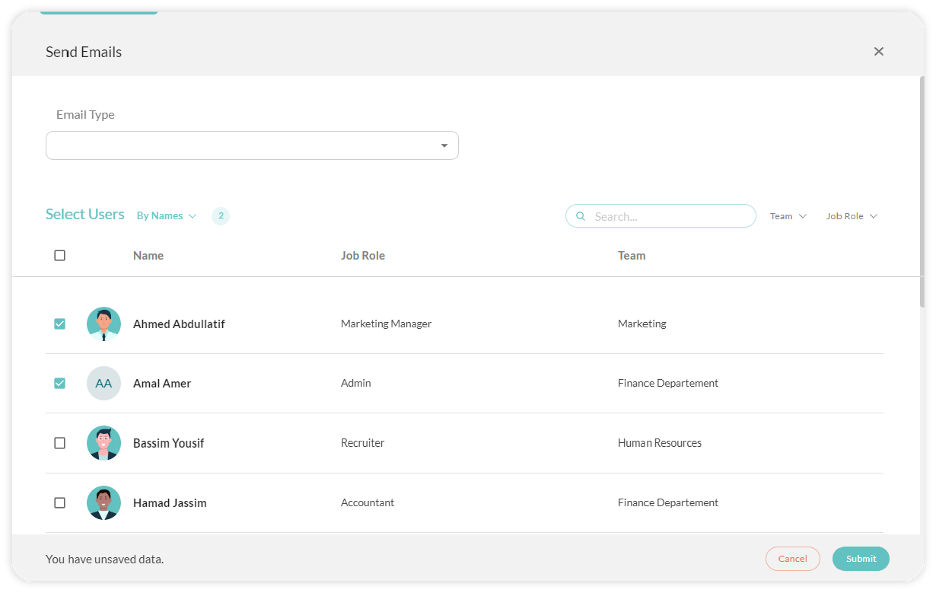
You can send different types of emails to a selected group of users by following the steps below:
-
-
- Select the type of email you would like to send the selected user from the drop-down menu that includes the following email types:
- Welcoming/Password setup account
- Welcoming reminder as a second follow-up email
- Password reset.
- Upcoming reminders of Learning items/paths due dates
- New enrollments to indicate that the user has been assigned to a new learning material.
- Custom to personalize the message of your email. When selecting this option, you will need to enter the Subject line and Body of the email while previewing the email layout on the right as it will appear to the user receiving the email.
- You can select users from the list provided or Search manually to easily find the user you intended to send emails to, as well as Filter the list of users according to Team or Job Role.
- Click on Submit to send the email. An autogenerated email will be sent to your selected user immediately.

- Select the type of email you would like to send the selected user from the drop-down menu that includes the following email types:
-
2.2 ![]() Activate Users
Activate Users
A welcoming email notification is sent to the user's email address informing them that their account is active. Included with the email notification are instructions for setting up their account. Then the user can access Lumofy platform.

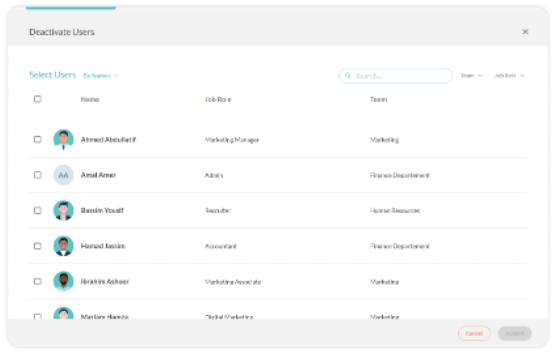
2.3 Deactivate Users
The user will not be deleted from the system but will no longer be able to log in to Lumofy and their records can be re-activated once again.

3. Upload
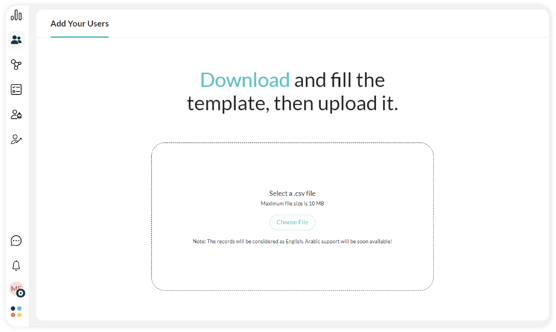
To onboard your organization’s users to the platform, Click on Download to obtain the required Excel spreadsheet.
3.1 Completing the Onboarding Spreadsheet
- Access the Excel file from your Downloads folder and start completing the required sheet to successfully onboard your users to the platform.
- Enter the First and Last Nameof the users you wish to onboard.
- Enter the Username and Email pertaining to each user.
- Enter the correct Job Title, Job Level, and Job Family pertaining to each user.
- If you wish to create a sub-team, select the Line-Manager each user belongs to.
- Complete all associated details, such as, Gender, Language, Phone Number (Optional), and User Role (Learner vs. Admin.)
- Click Save exit the Excel sheet.

8. Choose the Excel sheet containing all User data and Upload to the platform from your desktop.

9. If completed correctly, all data contained within the Excel spreadsheet will reflect on the platform and you will have onboarded your users to the platform successfully.
4. Export
Click on ![]() Export to download a report of all users’ data segmented into 3 categories:
Export to download a report of all users’ data segmented into 3 categories:
- Learning Progress Insights
- Learning Progress Detailed
- Organization Learning Progress
Note: Once you select your choice, the information will be ‘exported’ to your desktop as an Excel Spreadsheet.
5. Add
- You can onboard a new user by clicking on
 Add
Add - Enter the user’s details required, such as first and last name, email address, username, team, and job role.
- Press Create to proceed with adding the new user or you can click Cancel to exit the tap.

Note: you can add and manage custom user fields by clicking on Manage Custom Fields.
6. Additional Admin Functionalities
Click on the ![]() Options Menu on the right to perform the following functions in relation to each user
Options Menu on the right to perform the following functions in relation to each user
-
- This can include a Username, email, username, team, job role, and employee ID.
- You will also be able to choose the user’s role on the platform as Admin or User through User Permissions.
- Click on Manage custom fields, to create your own personal data fields when needed.
- Finally, make sure to click Update to reflect the changes you made.

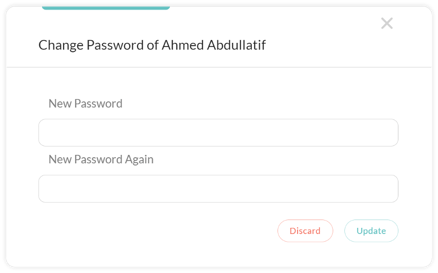
6.2 Change Password- To set a new password for any user.
-
- Enter your new password.
- Confirm your password once more.

c. Click Update to reflect the changes you made.
6.3 Become This User– To access the user’s version of the platform and mirror his usage.-
- Click on Become This User to mirror the user’s environment on the platform. Here, you will be able to view the platform as the selected user.
- To stop mirroring your user simply click on the button Stop at the bottom right, next to the user’s name appearing on the screen.

Note: You can Re-Activate Users by filtering the users' list by Account Status: Deactivated, then clicking Activate User from the![]() Options Menu.
Options Menu.
7. Viewing User Data
-
To obtain information concerning a specific user, simply click on the name of each individual learner.
-
Once you click the username, you will be able to view all user enrollments including learning items, assessments, quizzes, learning paths, objectives, and notifications.
-
If you wish to edit the user information, click on
 Edit next to the username. Enter your changes and finally click Update to save changes.
 -
Explore each tab (Learning Items, Assessments, Quizzes, Learning Paths, Objectives, and Notifications) assigned to each individual user to view the status, score, due date, completion date, and when the learning/assessment material was assigned.
-
Use the
 Search Bar to find a specific learning item assigned to a user.
 -
Click on the
 Filters button to filter data by duration, category, enrollment status, and item type.
 -
Click
 Actions to perform additional activities such as, enrolling the user in additional paths or learning items, or exporting data pertaining to them.
 Enroll
- Click Enroll to select the item/path you would like to enroll the user to.
- Once you click Enroll, the user will be notified of being assigned to the new item.
 Export
-
Click Export to download data pertaining to enrollments related to the chosen user as an Excel Spreadsheet such as the learning items the user is enrolled in, item types, and dates associated with the user progress status.
-
- Click on the Notifications on Email tab to view the emails the user received and whether they were opened and responded to.
- By clicking on the
 Options Menu on the right, you will have two options:
-
View All Attempts - to view how many attempts the user had with each assigned quiz, and you can even allow the user to retake the quiz.
-
Delete - to remove a user from an assigned learning item(s), where you will be asked to give your confirmation to perform this action.
-
